
Be a Beautiful Zombie Bride this Halloween
26th Oct 2017
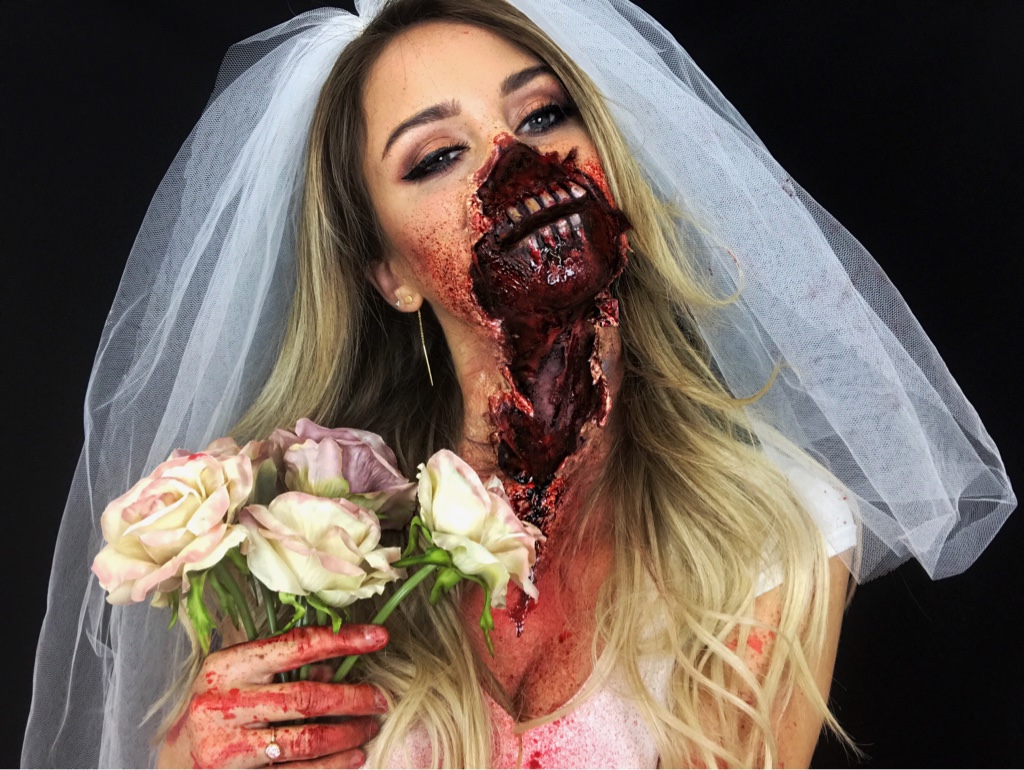
Nadine Mayerhofer has taken two popular Halloween costumes - a zombie and a bride - morphed them together, and kicked it up a notch, to create a horrifically fabulous Ripped Mouth Zombie Bride. The Mehron team is thrilled to partner with Nadine for this fabulous Halloween makeup idea, which is sure to get jaws dropping at any holiday party. The gruesome, gaping flesh and gorgeous eye makeup make an incredible contrast - and let you be beautiful and gory at the same time! Watch Nadine transform herself in the video below. We have provided the step-by-step directions for the look for easy reference. All the special effects makeup you need to create the look can be found on Nadine's Mehron storefront on Amazon.
- Start by applying your eye makeup.
- This look requires Liquid Latex. If this is your first time using Liquid Latex, be sure to test the product on your skin before starting this look to make sure you don't have a latex allergy.
- Split some tissues into single sheets.
- Using a makeup sponge, apply Liquid Latex from the bottom of the nose down on either side of the mouth. Center the tissue underneath your nose and press it into the Liquid Latex. Remove the leading edge by tearing, and fix again with more Liquid Latex.
- Bring the Liquid Latex down your neck. Put the tissue over the Liquid Latex, press, and fix with more Liquid Latex.
- Repeat steps 4 and 5 four more times. Then use the same method to connect the skin base across the bridge of your nose.
- Let everything dry.
- Next, the makeup. Select a hue, or mix two together, from the palette in the Mehron Special FX All-Pro Makeup Kit that matches your skin tone and apply all over the tissue/Liquid Latex "skin", blending along the outer edges.
- Rip a hole in the tissue/Liquid Latex "skin" by your mouth and rip down to your neck.Shred the "skin" until you achieve your desired look.
- Apply another layer of Liquid Latex along the outer edge of the "skin" and let dry.
- To create the fake teeth, apply Liquid Latex in the area you have ripped open and adhere pulled cotton balls.
- Apply fixing powder to the edges of the Liquid Latex.
- Using ProColorRing Bruise Wheel, apply the Bloody Rose all over the cotton you adhered to the open area. Use Burnt Maroon from the wheel to darken the corners. Don't forget to paint the inside of the fake skin as well.
- Rip and pull apart more of the "skin" on the neck and paint the newly opened area with Midnight Sky from the wheel.
- Now the teeth. Using Liquid Latex, apply fake nails as the teeth. Cover the Liquid Latex and create shadows with the hues from the Bruise Wheel. Paint the teeth with Maize Yellow from the wheel to make them look more natural.
- Use the wheel colors to create bruising on the chest.
- Apply Stage Blood all over, being sure not to forget to add the blood to the inside of the ripped "skin".
- Put on your veil.
- Spray Blood Splatter over the gaping "skin", face, chest, and shirt.